Showing posts with label Miscallaneous. Show all posts

Wednesday, 28 November 2012

Material Studies | Longevity & Decay

Just imagine opening a box you believed to have been safely stashed away years ago, only to open it and be confronted with this sore sight. At the time of storing, the motive was brilliantly logical. The Air Jordan XVII was a slept on release, even in this Wizards colourway. Sitting on a pair for some years to come would be an investment for the future. The chance to break out some deadstock Jordans from past gone years is a privilege of a few and in the instance of re-sale a true money spinner (corgieshoe). The sad reality is the process is by no means an exact science. In more cases than not the result is what you see above - a deadstock pair of sneakers going to waste having never seen the light of day.


As I may have hinted at already, keeping your sneakers deadstock or not is a choice that every sneaker enthusiast faces with each and every new purchase. There is no denying that a pair of sneakers looks best fresh out of the box, without a crease in the toe box or the slightest hint of dirt on the outsole. Sometimes, our love of sneakers takes things to levels that we would have never seen coming at that point of first purchase. We are all culpable of wishing eternal life for a special limited edition/ release, ever hoping that the arrival of a new day will bring with it the holy of holy's, the news of the discovery of the elixir of youth for our kicks. The truth is that wether you keep them on ice for years or wear them everyday, the inevitable will happen. They will end up cracked, crumbled, peeling, ripped, stained, torn and above all unwearable. If you want to look at them forever in their pristine state, just take a picture and then wear them so celebrating their transient grace. Sneakers are simply not made to last and it is the materials, not the design, that we can hold accountable for that. 

Let's get into the science of it!

Without breaking down the entire composition of a sneaker into its individual architectural elements there are four major material groups that pose the main problems for any collector. These are textiles, leather, rubber and plastics. A simplistic approach to taxonomy as this does not make plain the susceptibility that each category faces to the weathering effects of time. Thus the grouping of the material types will be done in descending order of durability. This will mean staring with the with the most durable and ending with the least durable. So, introduction aside it's time now for the nitty gritty.

Textiles and Leather:

The reçurent culprits to much material damage are sunlight and weather cycles. The simple science of this is that excessive sunlight bleaches colour pigments whilst the fluctuation of temperature and moisture content leads to the excessive expansion and contraction of cell structures. This in turn causes them to break precipitating a subsequent loss of strength in the material. 


Had you ever been tempted to apply a dressing to the premium leather of your bespoke Nike Air Force One or OG Jordan then be warned. Not only is it slightly unorthodox behaviour but applied dressings, such as a saddle soap, are fine whilst the object is in use. Let me just stress that again - IN USE. This is because the shoe is usually cleaned and a new dressing reapplied on a regular basis. Once this regular maintenance ceases, however, dressings often start to migrate to the surface where they form a sticky surface layer that attracts dust, etc. The worst bit is that this residual layer of dirt is what supports mould growth that is irreparable. Thus be warned any time you consider adding some form of protective dressing to your kicks.  


Rubber and Plastics: 

This is where things start getting a bit tricky as at this point the temptation is to fall into the trap of being overly scientific and thus boring people to tears. So, I have tried to keep the unadulterated science of it all to a manageable level and more importantly a relevant level.

Rubber is a very enigmatic material, in respect to its deterioration. Two apparently identical rubber components in the same environment can behave totally differently. One component may become brittle and cracked, whilst the other may become soft and sticky. Unlike most other materials, rubber tends not to be adversely affected by chlorides (acids). That means touching them with your sweaty hands with not cause any longterm damage. After all someone would have told NBA athletes to stop wiping their sweaty hands on the soles of their sneaker during games. Most importantly of all no real damage with be subjected on them by walking in the dirt of pavements and streets worldwide that exists outside of the sanitised world of the shoe box. 

At this point I'm quickly going to digress but it is all for good reason. To give a flavour of why new sneaker releases are full of new materials that we have never heard of is because there are over 2 million different types of plastics (and rising) that designers can choose between. What more, many materials can be added to plastics. For sneaker designers it is a means to improve the performance of the shoe. For instance to counter brittleness and impart elasticity plasticisers are used. To lower cost and to add strength bulking agents and fillers are used. For the increased longevity of the sneaker, stabilisers can be added to counter the effects of UV light, to prevent fungal attack or most commonly to reduce the rate of oxidation. 

Digression aside, probably the principal cause of deterioration of rubbers and plastics is sunlight. The composition of sunlight is such that its various wavelengths can cause different types of damage in different plastics. Basically there are two main types of damage - chain scissoring and cross-linking. Chain scissoring occurs when enough energy is absorbed to break bonds in the polymer chains. This results in a weakening of the plastic. For the sneaker head it is often observed as cracks or chalkiness of the surface of any part of the sole (usually the mid sole). Cross-linking occurs when absorbed energy promotes the formation of new bonds within the structure. Over time this can result in a plastic becoming insoluble in solvents that it was originally soluble in. More relevant to sneakers it can also result in the plastic becoming less flexible and elastic. This explains why that pair of OG Jordans disintegrated on the first time of wearing them after multiple years of proud display. 


What I fear is that in light of all this science some readers may read this article as an act of scaremongering. Worst still they might read too much into it. Worst of all I might have driven them to such insane measures as this....


If you have reached this stage of insanity then there is simply no help nor way back to normality. But as good an action as any to avoid the slippery slope to vac packing your entire sneaker collection is simply give them some air time. The beauty of this hobby of sneaker collecting is that everything comes back inevitably and you'll get another chance to re-stock on your favourite models and makers. 

Tuesday, 13 November 2012

Designer Database | Jason Petrie

I'm well aware that repeating one's facts is as pointless as preaching to the clergy so for those interested in the background story to Jason Petrie please visit my earlier post on him - The Alpha Project. In that post what I failed to do was share with you the manufactured designs of Jason's. So with no further ado here is a list to familiarise yourself with. 


Nike Force Stat 1:


Nike Air Force Stat 2:


Nike Air Max Lebron VII:


Nike Air Windmill Flight:


Nike Zoom Flight Club:

Monday, 12 November 2012

Design Studio | Designer Database


It has been a long time coming but at last Nike will explore the design innovation of Nike Basketball through the "Inside Access" Series for this NBA season. From creating silhouettes specifically for outdoors to the fabrication of shorts, finally some light will be shed on every step of the design process. We can only hope that there will be no cutting of corners or worse still, censoring in fear of copyright infringement. Sneaker culture needs to rekindle its love for the design process and not just for the finished item. We may need to keep our emotions in check as our sky high levels of expectations for all things Nike might be the projects ultimate disappointment.

We should, however, still all be optimistic of this series. The spotlight of public interest has once again returned to the design process and having briefly profiled Jason Petrie last time round it would only be logical to continue with the design thread and so player profile a selected bunch from the Nike shoe designing team. If like Nike the topic for discussion is about all things basketball then the names Tinker Hatfield and Eric Avar are the top of anyone's list. Comparison is innevitable and at times insightful but for a comprehensive sneaker for sneaker comparison, it would be best saved for another day. For the meantime lets say Avar's shoes are performance monsters. The records speek for themselves: Penny's, Foamposites, Flightposites, Hyperdunk and Kobe's last three shoes. Tinker's (though less spectacular when considering performance) are formally and stylistic second to none. He can boast of having Air Jordan as his backdrop and having put elephant print on the Air Jordan III and patent leather on the XI. It's also hard to argue against the XXIII being one of the best looking sneakers of all the Air Jordan line. Last but not least he created a whole new category of shoe (cross training) but then again we are talking about all things basketball. What can definitively be agreed upon is there wouldn't be one without the other. 

What I would like to attempt to get started here is to freshen up the arguments apropos of the greatest shoes and their designers for Nike. It will be the subject matter of posts to come in which the nitty gritty details of individual sneakers will be closely examined. As for the meantime a long list needs compiling of designers and their sneakers so by reminding many that there is more to the world of sneaker design that the names Tinker Hatfield and Eric Avar. 


AARON COOPER

Bio - Aaron Cooper has enjoyed quite an eventful 15 years on the footwear industry, and though he's most known for designing the Air Pippen line for Nike Basketball, he's also been able to lay claim to several hits in both the Running and Training categories. After getting his star in hoops and spending a few years in Amsterdam heading up Nike;s European Design Studio, he's back on U.S. soil now, heading Nike's Training division as Global footwear Design Director and guiding the group as it continues to evolve their newly versatile loin of footwear and apparel.  

Nike Ait Hover Uptempo:


Nike Air MZ3:


Nike Air Flight 1996:


Nike Air Pippen 1: 


Nike Air Pippen 2:


Nike Ultraflight:


Nike Ultraposite:


Nike Air Zoom Generation


Nike Air Flight Max 2 (Google patents shows a similar lacing system in his name): 


Thursday, 11 October 2012

Nike SPD | Dan Mather


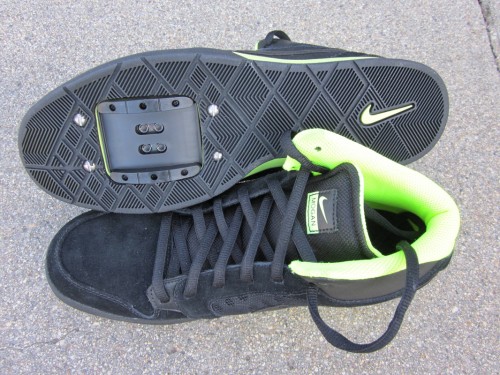
Out of the 78 creatives chosen to challenge the function of Nike shoes in the Nike 78 project, Dan Mather's attempt to transform a pair of Nike sneakers into cycling shoes may have the greatest repercussions for the sneaker community.  As he rightly states, "cycling shoes are generally designed with one purpose in mind; for transferring power from your foot to the pedal, with most efficiency". Naturally, the balance between aesthetic and function is ignored. For the recreational cyclist who may prefer to priorities aesthetics over function, is currently forced to cycle with a traditional pedal kept either open or to increase performance, worn with clips and straps. In the later set up the shoe is subject to wear, damage and eventual deterioration. This is a dilemma that faces any sneaker enthusiast with a disposition for cycling. Carrying a spare pair may seem like an obvious answer but given the frequency of rides one would have yearly, the impracticality of carrying a spare pair and having to change footwear becomes apparent. So Mather's proposal of marrying a bicycle shoe and a sneaker together is not such a bad idea. To quote him directly again, "Nike shoes are ubiquitous with fashion and popular culture irrespective of sport, so I have transformed my Nikes into a pair of cycling shoes that strike the balance between function and aesthetics, creating a pair of functional, yet desirable sneakers you can wear both on and off the bike".  


Judging from the pictures alone, the finished product is not quite there. The profile of the plate and clip still protrudes too much from the sole of the Waffle Racer. The problem is only compounded further by the clip failing to be of equal measurement to the protrusion of the pimples on the sole. If the shoe was to work as a true hybrid the plate and clip would need to be set deeper into the sole in order accommodate the wearing down of the pimples when walking for an extended period of time. A good example of how the concept might have been executed better is like the image below. 


The exact working methods of Dam Mather are unknown but I will attempt to explain how a better finish could be achieved. 

Firstly the choice of shoe is important for it's integral to avoid the cleat ripping out of the sole from the sheer volume of power transferred between your foot and the pedal. A general rule of thumb is any sneaker with a polyerethane base instead of the regular EVA foam is best as under extreme pressure it doesn't compress as easily. Also Nike Air Zoom technology is a safe bet because the air in the Zoom unit(s) is pressurized, while the regular non-zoom air units are not. If that is all too much to remember the thicker the sole unit the better. The Nike Air Force 1 should be the benchmark. 


Now for the technical details as supplied by Retrofitz:


Parts:

1) 2 injection molded impact modified nylon plates
2) 2 injection molded Shore 85A TPU rubber bumper
3) 8 stainless steel binding post and screw


Cut placement:

4) Placement of the thru hole dictates cleat placement


Recommended tools:


- steel rule die
- drill alignment fixture with custom 3/8” thick UHMW cutting board
- 3/8” thick UHMW cutting board
- custom ground step drill 0.090”/.1875” with stop gauge
- shoe sole thickness gauge 
- 4 Ton arbor press
- aviator snips 
- standard screwdriver 
- metric ruler
- marking pen 
- 1-1/2” wide painters masking tape
- 1/2” wide painters masking tape
- drill press or handheld drill 
- 1/8” diameter 4-flute end cutting end mill
- hacksaw 
- paper
- large calipers


Important facts to check about the sneakers:

5) SPD cleats will not properly engage pedal if shoe sole (in the area where the cleat will be located) is greater than 10mm thick. 
6) If shoe liners are permanently glued into place and cannot be removed, the shoes may not be suitable. 

Next steps:

7) Remove shoe laces and shoe liners
8) Layout the thru cut lines on the bottom of the shoe
9) The cut should be parallel with the shoe centerline
10) The cut should penetrate the sole only, not the side panels of the shoe
11) The cut must be placed with consideration for the four threaded fasteners that will hold the cut into place
12) The inside edge of the cut must be X Dimension = 22mm or less from the widest part of the shoe, this provides 5mm of clearance between the shoe and the pedal. 
13) The Y dimension is subject to disgression:
                    - plate placement: insure the mounting holes will penetrate the sole appropriately
                    - rider preference: cleat placement has a large influence on power transfer
and riding efficiency
                    - in general the centerline of the cleat should fall somewhere behind the ball of the foot where possible


14) Confirm cut lines will appropriately penetrate shoe interior and shoe sole
15) Some shoes have very narrow toe boxes and the die will have to be carefully plaveed to insure the hole is located appropriately
16) Use large calipers to visualize where the die will penetrate the shoe interior
17) Make adjustments to the cut location as necessary to avoid cutting thru shoe sides
18) Maintain the X=22mm maximum
19) Measure twice, cut once!
20) Prepare UHMW cutting board, insert inside shoe opposite steel rule
21) Use a removed liner to trace and cut the profile on 0.25" thick UHMW cutting board
22) The steel rule die will lightly cut the into the UHMW cutting board 
23) The UHMW cutting board protects the interior of the shoe from being cut by the die


24) Secure steel rule die to shoe
25) Align die edges with tape
26) Use 1.5" wide tape to secure the shoe
27) Use generous amount of tape to wrap around top of shoe
28) Confirm die is aligned with the centerline of the shoe
29) Measure twice, cut once!


30) Cut hole 
31) Repeat previous steps for shoe 2
32) Confirm the steel rule die is placed in the same place on the right shoe as on the left
33) It is mandatory that the cuts are accurately "mirrored" to the opposite shoe for proper cleat alignment
34) Measure twice, cut once!


35) Insert hole boring to shoe
36) Insure the UHMW cutting board is cut to fit inside shoe interior woth room to spare, otherwise it may cause the fixture to twist and be mis-aligned relative to the cut hole


37) Bore 1/8" holes thru shoe sole using the 1/8" four flute cutting endmill 
38) Counter bore the four holes
39) Repeat these steps for other shoe
40) Trim nylon plates to fit inside shoes
41) Make paper cutout of shoe interior using removed liners
42) Trace cute opening onto paper cutout
43) Align paper cutout onto nylon plates with opening aligned to the plate details
44) Transfer outline of shoe interior onto nylon plates using paper cutout template


45) Trim the nylon plate to fit inside the opposite shoe
46) Assemble nylon plates to shoes 
47) Use stainless steel binding head fasteners provided


48) Assemble 4 hole threaded plate to both shoes
49) Insert shoe liners
50) Re-lace shoes